Spying on Apps
[ This post was originally published on Medium ]🕵️♀️ Spying on Apps: How to Sleuth Back
It shouldn’t come as a surprise that data is gold, and tech and non-tech companies alike are rushing to obtain it. Unfortunately for you and me, that means our privacy, both digital and non, is being encroached upon. From app developers stealing digital candy from babies to the myriad of Facebook privacy violations , all of our activity on any smart device is being tracked, mapped, and then cashed.
Like prior gold rushes, online privacy has become a very political and nuanced issue; ergo, only a select few are fully aware of the scope and influence of today’s 49ers. The intent of this article is to empower you to pan the gold flowing down the data steams of your computer, phone, thermostat, etc. using mitmproxy .
My intent in writing this article is to appeal to anyone with any tech
experience. Whether you're 👨💻, 👩🎤, 👨🚀, or 🧛♀️, you should be able to follow this
tutorial.
...Ok I lied a bit- I'm only going to walk through how to set up mitmproxy with
the Apple tools I have: macOS and iOS.
Part 1
First, the Internet
Before we get our hands dirty, let’s take a quick look at what we’re working with (feel free to skip ahead if your a know-it-all):
HTTP
Hypertext Transfer Protocol defines how a client (i.e. your web browser/phone) and server (i.e. Facebook, Yelp, Google, etc) should converse with one another. It’s structured around a request-response cycle. For example, we request the webpage www.google.com and Google responds with a packet of files. There’s a few additional features involving caching and relaying requests, but that’s out of the scope of this article.
HTTPS
To prevent eavesdropping and man-in-the-middle attacks (more on this later), we updated the security of HTTP by adding an encryption layer (SSL). With HTTPS, the data is encrypted bidirectionally- meaning, both the client and server encrypts their data. Before the client approves the response, it’ll first verify the server’s identity by ensuring it has a certificated signed by a trusted CA (Certificate Authority). There’s a few more nuances here, but again, it’s out of the scope of this article.
mitmproxy
mitmproxy is a suite of tools used to intercept and modify the web traffic described above. If we dissect the name, we see it’s employing a man-in-the-middle (i.e. MITM) via a proxy server (i.e. an intermediary between the client and server). For HTTP requests, mitmproxy simply receives the requests, passes it along to the server, receives that response, then passes it back to you (the client). For HTTPS requests, mitmproxy acts as the CA. Now, before you go hacking the world, understand that mitmproxy is an untrustworthy CA, so you (the client) have to deliberately trust the mitmproxy cert before it can actualize a successful MITM attack.

The Setup
Let’s begin.
Install mitmproxy
brew install mitmproxyDon’t have Homebrew? Install it here (don’t worry- Homebrew is trustworthy and a very cool way to install the things you need in life 😇)
Fire Up mitmproxy
mitmproxy --showhostFor the non-techies: to quit mitmproxy, type q followed by y. To go back to the terminal while mitmproxy is running, type command + t to open a new tab.Get The mitmproxy Certs
Copy the directory containing your mitmproxy certificates to your Downloads folder with the following command:
cp -r ~/.mitmproxy ~/Downloads/mitmInstall Your certs
Open the mitm folder and double-click the mitmproxy-ca.pem file (this should
open up Keychain Access). Double-click the mitmproxy listing, and then
change the Secure Socket Layer (SSL) to Always Trust.
Alternatively, you can visit http://mitm.it , click the Apple symbol, and then follow their directions (we’ll need access to the .mitmproxy directory in the next step though). You also need to setup your browsers before doing so (see next steps).

Setup Your Browser
Chrome and Safari will use your system's preferences. Firefox has it's own set of preferences. If you prefer Firefox, scroll down to the next section.Go to System Preferences > Network > Advanced… > Proxies
From there select HTTP and HTTPS, and then input 127.0.0.1 as the server name (left of the colon) and 8080 as the port (right of the colon). Make sure you fill out the forms for both HTTP and HTTPS! Click OK and then Apply.
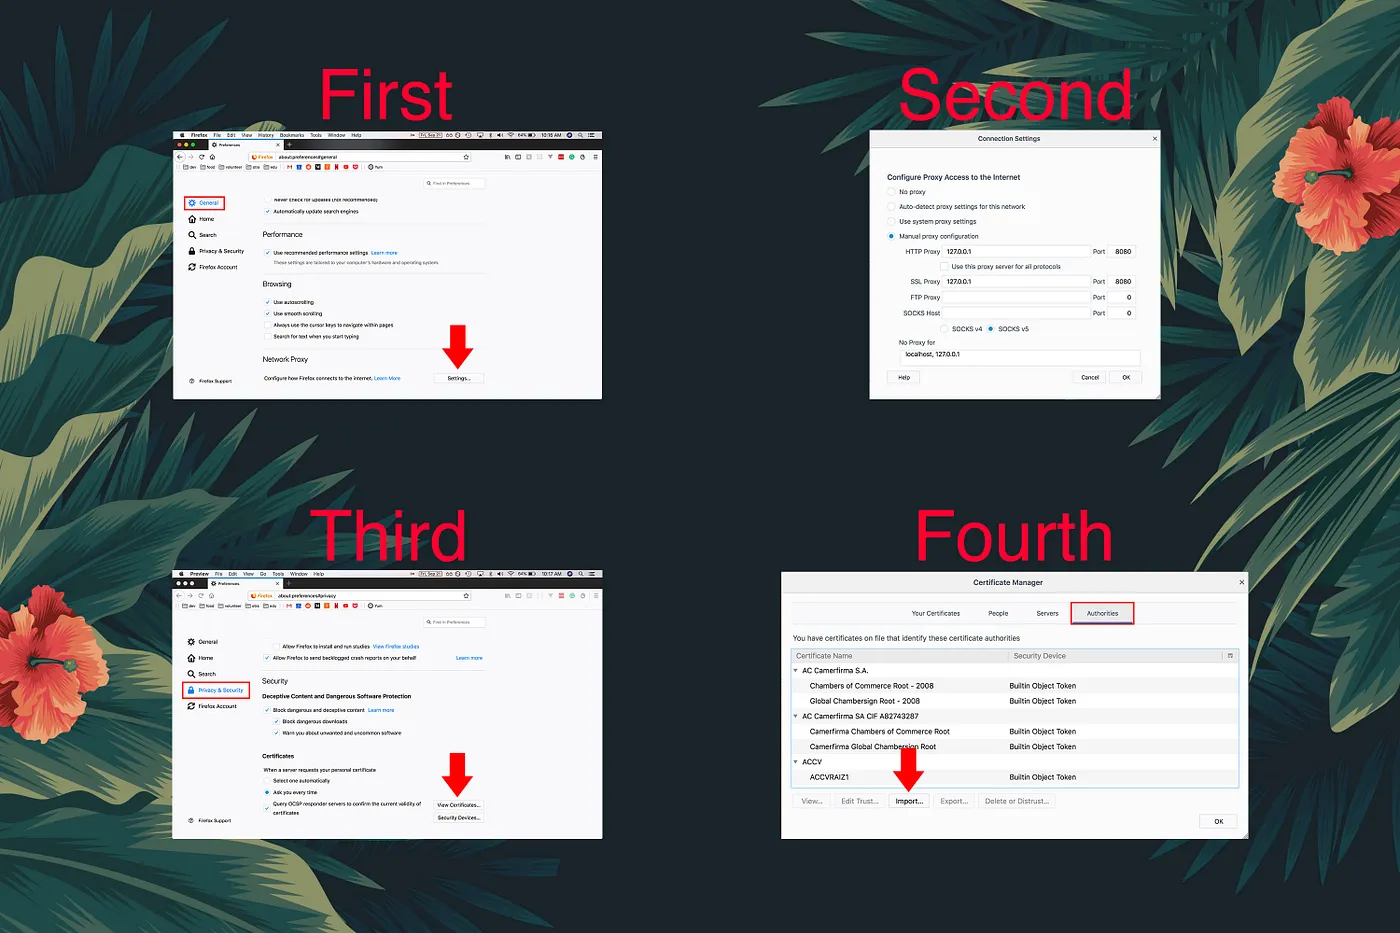
Setup Your Browser (Firefox edition)
Go to Firefox’s preferences (command + ,). Scroll to the Network Proxy header and then click the Settings… button (alternatively, just search for “proxy”). In the following screen, select Manual proxy configuration radio button, and then input 127.0.0.1 as both the HTTP proxy and SSL proxy, with 8080 as the port.
Return to the preferences screen, in the Privacy & Security section, scroll to the Security header and under the Certificates sub-header, click the View Certificates… button (alternatively, just search for “certificates”). From there, click the Import… button and select the mitmproxy-ca.pem file from the mitm directory (located in your Downloads folder). Click the OK button when finished.
Setup Your Phone
Feel free to skip this section if you only want to inspect the data streaming from your computer's browser.Get your router’s IP address from System Preferences > Network screen (it should be listed under your WIFI’s name).

Next, send the mitmproxy-ca.pem cert to your phone, either via email or airdrop. Once received, simply click Install and your phone will do the rest. In Apple’s eyes, this cert looks a bit sketchy, so we may need to advisedly trust it by going to Settings > General > About > Certificate Trust Setting and enable FULL TRUST FOR ROOT CERTICATES for mitmproxy.
On your phone, in the Settings > Wi-Fi screen, tap the blue ⓘ next your network’s name. Scroll down to HTTP PROXY and set Configure Proxy to Manual. Input your IP address in the Server field and 8080 in the port field.
If for any reason you would like to remove this cert, you can find it in Settings > General > Profile.
Congratulate Yourself!
mitmproxy is now setup!
If you’re not running the proxy, your internet will be broken. Go back and reset your browser/network’s proxy settings and turn off the HTTP proxy on your phone to go back to the good ol’ non-mitmproxied internet :)
To turn off the proxy:

* For Safari and Chrome, uncheck the Web Proxy (HTTP) and Secure Web Proxy (HTTPS) checkboxes
* For Firefox, select the No Proxy radio button
* On your iPhone, set Configure Proxy to Off
Part 2
Break it Down
Let’s take a look at the data we’re getting in. Fire up mitmproxy and then visit the site of your choosing: say www.wired.com for example. Before doing so, let’s nuke our browser cookies and history, and then close all the apps on our phone.
mitmproxy --showhost
Take a look at the second request near the big red arrow. On the first line we see the client’s request, including:
- HTTP method : This indicates what type of request the client is making (i.e. GET-ting data from a server or POST-ing data to a server)
- Endpoint: This is the address for the resource being requested
- HTTP revision: 1 being HTTP and 2 being HTTPS
The second line contains the server’s response, including:
- HTTP response status code : This indicates if the request was successful or not.
- Type of response : Also known as a MIME type, this labels the data as either an HTML document, an image, an audio file, a font, etc
- Size
- Response time
Another thing to note is the number on the bottom. By the time the page loaded, the client (i.e my browser) made ~100 requests! Keep in mind this includes requests made by browser extensions and trackers as well.
Shortcuts!
Before we track down some trackers, I want to give you a few shortcuts.
- arrow keys: move the indicator along the list of requests
- enter: dives into the request/response details (from here, use the arrow keys to navigate between the request, response, and detail screens)
- esc: exits a prompt or returns to the list view
- spacebar: jumps to the next page of requests
- w: saves the request
- r: replay the request
- z: delete all the requests
- f: filter for a type of request. List of commands can be found here
- shift + ?: see a full list of keybindings
Who’s Tracking Who?
Let’s find a tracker! Web beacons (A.K.A tracking pixels) are often loaded onto a webpage as a tiny gif. Let’s find one by typing f to set a view filter, then type
t gifUgh, I’m showing around 70 results pop up. Mostly from Parse.ly or Wired’s parent company Condé Naste. Gross. Selecting a random request (by pressing enter) doesn’t reveal too much… mostly that I’m on a desktop and they’re tracking the time I’ve been on their site.
How about JSON requests:
t jsonNot too many results, but randomly inspecting a request, I can find my exact location in the response payload… creepy.

Let’s take a look at what my phone is puking out. I’ve opened up the Dictionary app and here’s the results:

More than half of the network activity is dedicated to ads. sad. After letting it sit a while, my background app activity kicks in. Notice the different HTTP methods: Most are XML related (PROPFIND and PROPPATCH) or are some preflight requests (OPTIONS).
Welp, that’s about it. I’d encourage you to continue poking around and please let me know if you find anything weird. This is just the tip of the iceberg. You can use mitmproxy to also modify data streams, which opens the doors to who knows what.
Thanks!